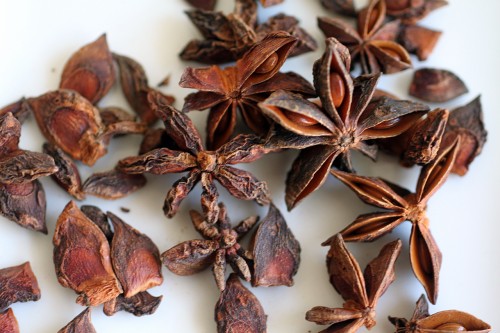
X

Sign up to receive exclusive recipes, tips, updates and other goodies from Aliya!

  • Home
  • Blog
    • All
    • Recipes
    • Spices + Ingredients
    • Lifestyle, etc.
    • Travel
  • The Cookbook
  • The App
  • Media
    • All Media
    • Video
  • About
  • Passions
Aliya LeeKong
  • Home
  • Blog
    • All
    • Recipes
    • Spices + Ingredients
    • Lifestyle, etc.
    • Travel
  • The Cookbook
  • The App
  • Media
    • All Media
    • Video
  • About
  • Passions

Star Anise

View fullsize star-anise-pic1-500x333.jpg
View fullsize star-anise-pic2-500x333.jpg

Star Anise

This might sound completely idiotic, but I’ve recently been hit over the head with the fact that everyday is a totally subjective monster.  What’s everyday to you may be completely foreign to someone else, and so it’s always better to err on the side of giving too much info lest you leave someone out!  Recently, I’ve been doing a lot of events and I always keep a bunch of spices out on the table.  I’ve noticed that, without fail, star anise seems to draw people in who want to know more about its flavor and how to use it in cooking.

Spidery, little star anise is actually the fruit of an evergreen tree that’s been dried.  The spokes of star anise are usually split, revealing a shiny, oblong seed; interestingly enough, the pod has a lot more flavor than the seeds.  And what an incredible flavor!  Although completely unrelated to aniseed, the flavor is similar with really strong, licorice-like notes.  There’s also a woodsy spiciness, not unlike cinnamon or even clove – truly complex and warm and deep.  When you inhale the fragrance of the spice, it smells sweeter and more herbal than it tastes.  The scent is transporting…

Star anise is a secret weapon, that ingredient you can add to everything from desserts to braises that people won’t be able to identify.  I’ve used it in a few sweet dishes on here: a sugar plum sherbet and my Godson’s favorite banana & star anise tapioca pudding (see note below), and I plan to throw it in a mean, super spiced apple pie post apple-picking; it’s ridiculously delicious with vanilla bean, cinnamon and nutmeg .  But it’s a beautiful ingredient on the savoury side as well – key in Indian garam masala and Chinese five spice, this spice takes bbq sauce to a new level and is gorgeous in some wine-braised shortribs.

Although beautiful in its whole state, beware that it is extremely difficult to grind star anise to a complete powder without industrial strength.  I like to keep some whole ones to throw into liquids as the flavor diffuses easily and also keep some powder for dishes where a ground spice is more appropriate.


Note: Star anise should NOT be confused with Japanese star anise. Star anise (which is the Chinese version that is typically sold for cooking purposes) has long been used to treat colic in babies in many different cultures along with fennel and anise.

tags: star anise, spices
categories: all-2, spices-1
Thursday 10.06.11
Posted by Aliya LeeKong
 

Hawaij, a Yemenite Spice Blend

View fullsize hawaij-500x333.jpg

Hawaij, a Yemenite Spice Blend

Lately, I’ve been noticing certain occurrences, coincidences, tapping me on the shoulder, and I’m learning that it’s important to pay attention when these things happen.  They say things come in threes, and that’s how I thought to take notice of this spice mix.  First, I read this poignant article on how loss motivated a return to culture in the case of Chef Michael Solomonov and (a restaurant I’ve been dying to visit) Zahav in Philly.  And hawaij is mentioned.  Second, I was flipping through one of my favorite author’s cookbooks, Claudia Roden and the Book of Jewish food – and, again, this spice blend jumped off the page at me.  And third…it’s Rosh Hashanah – Happy New Year to those that celebrate!

Hawaij is actually a Yemenite Jewish tradition, a ground spice mixture that consists of black pepper, saffron, turmeric and cardamom.  In Aden, a port city of Yemen, the blend is slightly different – it still has black pepper and cardamom but includes cumin and coriander (according to Claudia).  Of course, other sources include clove, cinnamon, and even ginger in the mix – it’s definitely one of those traditions that differ by family history.   The turmeric in the blend obviously draws parallels to curry, but to me, the flavor is floral, peppery, earthy, and astringent from the cardamom.

It’s typically used in soups and stews and to flavor rice, but it also makes a killer spice rub.  I envision some crispy chicken thighs rubbed with hawaij drizzled with a  delicious pan sauce  from the chicken drippings, stock and butter.  That just made me so hungry.  I also love the idea of lively-ing up a basic fall/winter brothy soup with a small teaspoonful of this stuff.  And, you know, why not a tender, fall-off-the-bone osso bucco seasoned with hawaij and served with a fall mushroom risotto?  I’m motivated – so check back for recipes with hawaij soon…

tags: Hawaij, Yemenite spice blend, Yemenite Jewish cooking
categories: all-2, spices-1
Thursday 09.29.11
Posted by Aliya LeeKong
 

Buttermilk Gruyère Biscuits with Ajwain

View fullsize biscuit-pic1-500x333.jpg
View fullsize biscuit-pic2-500x333.jpg
View fullsize biscuit-pic3-500x166.jpg

Buttermilk Gruyère Biscuits with Ajwain

Let’s face it.  Those biscuits in the refrigerated section of the grocery are easy (and tasty!), and we’ve all used them in a pinch to deliver some buttery goodness to the breakfast or dinner table.  BUT.  It’s just not the same as the homemade kind (see: nothing artificial), and this recipe, with or without the fancy cheese and spices, is so easy and quick, you may swear off the metal tube-sort for good…

I have always loved cheddar-thyme biscuits, and those were precisely the inspiration for this spice-flecked version.  I wrote about ajwain some months ago and used it in a gorgeous pissaladière with mushrooms and onions, and what I think is fantastic about this spice is its resemblance to thyme, albeit with a slightly more pungent, menthol quality to it.  It’s used a lot in South Asian cooking and is often added to flatbread or samosa dough.

The base of this recipe is self-rising flour.  I used it because it has a slightly lower protein content than all-purpose, which translates into super tender, flaky biscuits.  White Lily brand is supposedly the go-to flour for Southern biscuits because it has a significantly lower protein content than some of the other national brands out there, but if you can’t find it, any self-rising flour works well here.  You whir the flour with cold butter, pour in some buttermilk and voilá! Biscuit dough in about 2 minutes flat.  I add in some grated gruyere or cheddar, typically, along with a bit of ajwain for that signature flavor.  Enjoy!

Ingredients

Yields 1 dozen biscuits

2 cups self-rising flour

¼ tsp black pepper

½ stick cold, unsalted butter, cut into small cubes + 1 tbsp for brushing

1 cup grated gruyère or cheddar cheese

½ tsp ajwain seeds

¾ cups cold buttermilk

kosher or maldon salt

Procedure

The key to making tender, flaky biscuits is to not over-develop the glutens in the dough.  One way to do this is to keep all of the ingredients cold, and another is to not work the dough too much.

Preheat the oven to 425° F.

In a food processor or stand mixer, sift the flour and the black pepper together.  Add the cold, cubed butter and pulse or mix just until a sandy texture forms, and there are no visible clumps of butter.  Add the cheese and ajwain seeds and pulse to combine.  Pour the buttermilk in all at once and pulse until the dough sticks together.

Turn the dough out onto a floured surface.  Gently knead the dough a few times so that it comes together and form into a flat, 1-inch thick disc.  Use a 2-inch cutter to cut out a dozen biscuits.

Melt 1 tablespoon of butter over low heat in a small saucepan.  Place the biscuits so they are touching on a greased or parchment-lined baking sheet.  Paint the tops of the biscuits with the melted butter and sprinkle with a little salt.

Bake for 15 – 20 minutes until golden brown.  Serve warm…

tags: buttermilk biscuits, buttermilk cheese biscuits, Gruyère, Buttermilk Gruyère Biscuits, Ajwain, homemade biscuits
categories: all-2, breads & cakes, side dishes, recipes, vegetarian-1, breakfast
Monday 09.26.11
Posted by Aliya LeeKong
 

Umeboshi Paste

View fullsize umeboshi-pic1-500x333.jpg
View fullsize umeboshi-pic2-500x333.jpg

Umeboshi Paste

Ok, so I have to admit.  In gathering all of my ingredients for the popcorn with homemade furikake, I went a little bit wild in Sunrise Mart.  Food shopping almost trumps shoe shopping, and I totally glazed over that day throwing item after fascinating item into my basket.  In the end, I walked out with three different kinds of soy sauces, some matcha green tea powder I plan to use in shortbread, and a diluted yuzu seasoning base I already have used to make a killer fish marinade.  I also picked up some of this totally unexpected umeboshi paste…

Umeboshi are Japanese plums that have been pickled with red shiso and salt, and the paste is simply the purée.  The plums are traditionally eaten with rice or inside a rice ball, in sushi, layered between egg slices, with tea or even shochu.  The flavor is distinctive – tart and plum-my, a touch of sweetness, and extremely salty – and if it’s a wet version, the umeboshi “vinegar” (or left over pickling juice) is super strong and acidic, so use in moderation.

I have all sort of thoughts for how to use umeboshi paste!  Yes, in salad dressings and marinades – it’s the perfect acidic balance.  But also mixed in with yoghurt for a crudité dip, with garlic in an aioli, to round out a beautiful cocktail (killer margarita ingredient! No salt rim necessary…), in scrambled eggs, to add a kick to a potato gratin, or to jazz up a simple brothy soup.

You can find umeboshi and umeboshi paste at most Asian grocers, at certain Whole Foods and online retailers.

tags: Umeboshi, Umeboshi paste, Japanese ingredients
categories: all-2, spices-1
Thursday 09.22.11
Posted by Aliya LeeKong
 

Popcorn + Homemade Furikake

View fullsize popcorn-pic11-500x333.jpg
View fullsize popcorn-pic2-500x333.jpg
View fullsize popcorn-pic31-500x165.jpg

Popcorn + Homemade Furikake

Popcorn (with, ahem, a goblet of red wine) is my signature comfort food; it’s what I crave after a hard day or if I’m settling down on the couch for a night of t.v. or to watch a movie.  A number of years back, I went through this Hawaiian Hurricane popcorn faze where I must have consumed this concoction of buttery popcorn with Japanese furikake and rice crackers on a daily basis for weeks on end.  As expected, I made myself sick and had to swear off the stuff, but a recent conversation with a friend (who is a homemade popcorn snob!) made me think revisiting the idea, on a healthier, homemade basis, might not be such a bad idea…

Furikake is a Japanese seasoning that is typically sprinkled on top of cooked rice but is truly an all-purpose condiment.  There are different versions with the core of roasted seaweed, sesame seeds, salt and sugar mixed in with other ingredients like bonito flakes, ground shiso leaf, dried egg, miso, salmon flakes, and powdered soy sauce.  It’s a truly umami experience, and once you try it, you start thinking of other ways to incorporate furikake into your cooking.

And, on top of popcorn, drizzled with butter – it’s perfect!  You get that crunch of the popcorn along with lovely butteriness, saltiness, a touch of sweet, nuttiness from the sesame and rice crackers, a (very pleasant) touch of fishiness from the bonito flakes, and that umami of the seaweed.  Consume this in moderation lest you fall into an addictive phase like I did.  This is an elevated version of popcorn worthy of being served at parties or simply as a special treat for the family.  Enjoy!

Ingredients

Yields approximately 14 cups (one big bowl)

4 tbsps vegetable or blended oil

½ cup popcorn kernels

4 tbsps unsalted butter

½ tsp soy sauce

4 tbsps furikake (see recipe below)

1 ¼ cups Japanese rice crackers (optional)

Procedure

In a medium-sized pot or large saucepan with a cover, add the oil so that it coats the bottom of the pan.  Add the popcorn, cover, and place over medium-high heat.  When the kernels start to pop, shake the pan until the popping slows to a few seconds between each pop.  Shaking the pan will help to prevent the popcorn from burning.

In a small saucepan, melt the butter and add the soy sauce and furikake.  If using, add the rice crackers to the popped popcorn, and pour the butter-soy-furikake mixture all over, tossing to coat.  Tranfer to a large bowl and serve warm.

Homemade Furikake Ingredients

Yields approximately 4 tbsps

3 tbsps roasted shredded seaweed*, torn into smaller pieces

¾ tsp bonito flakes**

1 ½ tsps black and/or white sesame seeds, toasted

1 tsp salt

1 tsp light brown sugar

Procedure

Mix all the ingredients together and store in an airtight container.

*If you can’t find this, you can roast nori or seaweed sheets in a skillet over medium heat until they turn crisp.  They can then easily be torn or crumbled into small pieces.

** Look for the smallest flakes to use here.  Bonito flakes are from a type of tuna that is cooked, smoked and dried.

tags: popcorn, homemade furikake, snacks, comfort food
categories: man-friendly, recipes, snacks, all-2, vegetarian-1
Monday 09.19.11
Posted by Aliya LeeKong
 

Bzar, an Emirati Spice Blend

View fullsize bzar-pic1-500x333.jpg
View fullsize bzar-pic2-500x333.jpg

Bzar, an Emirati Spice Blend

It was kismet!  My good friend, Arwa, over at La Mère Culinaire and I have been emailing back and forth about Emirati food.  She keeps telling me how I have to head out to Dubai to get some serious cooking lessons in the cuisine of the region AND even went so far as to send me this gorgeously fragrant spice blend to entice me further.  A few weekends ago, as I was catching up on all my food mag reading, I came across this article in Saveur that talks about the same blend!   It’s called bzar, is key to making delicious and authentic Emirati cuisine, and I just had to share it with you all.

Now, this super special version that Arwa sent me is actually her grandmother’s secret recipe (love it!) that her aunts gather at her grandmother’s house to make.  She tells me that you can pick up pre-fab versions of the blend in the UAE (and I’ve seen a few versions masquerading around as Arabic Spice Blend here), but apparently her grandma’s is the real deal and so I feel very fortunate to have some. 

The good news is that the individual spices that make up the blend are all readily available.  Cumin seeds, coriander seeds, black peppercorns, fennel seeds, cinnamon, cardamom, nutmeg, ginger, fenugreek seeds and dried red chilies all go into this complex blend, and the cumin, coriander and red chilies are dry roasted in a pan before blending to a powder with the rest of the ingredients.

Bzar is used to spice Emirati stews, which are often called saloona or marag, is an integral ingredient in Emirati foga, meaning “on top of”, which is a rice dish where lamb, chicken or fish is on top of the rice, and makes a great rub for fried fish!  I used it in a lamb stew I made and even tried it with lentils (delicious!).  It’s warm, earthy – perfect in time for the Fall and would make a fantastic rub for any roast.  Bzar-rubbed roast chicken anyone?

tags: Bzar, Emirati spice blend, Emirati food, Arabic Spice Blend
categories: spices-1, all-2
Thursday 09.15.11
Posted by Aliya LeeKong
 

Farm Stand Corn & Mushroom Tortilla Salad

View fullsize corn-tortilla-pic2-500x333.jpg

Farm Stand Corn & Mushroom Tortilla Salad

I walked into a coffee shop the other day, Nina Simone playing in the background, an unidentifiable buzz and warmth in the room and the scent of hot beverages brewing, and it totally transported me; I feel ready for the cooler months ahead to be filled with days of apple picking, Fall dinners with friends in Fort Greene, weekend drives to go leaf peeping, the build to the holidays and rum toddies.  I’m finally facing the fact that it’s the end of summer and am filled with this mixture of wistful nostalgia and excited anticipation of the fall to come. That said, it’s my last hurrah! And I couldn’t help but take one last shot at summer with this beautiful salad inspired by the farm stands I visited out in the South Fork this past week and a Mexican tortilleria in Queens where I spent the day cooking.

In thinking about Mexican food and traditions, I wanted to visit Tortilleria Nixtamal because they make incredible corn tortillas in keeping with true Mexican tradition, a not-so-straightforward process that hinges on corn quality, cal, humidity, and timing (they happen to supply to many of the best of the best Mexican restos in town).  The restaurant also turns out gorgeous authentic food to boot, so I headed out to Queens to learn a few dishes from the Chef there, Santiago, and see just how this tortilla process works.  My time at Nixtamal and this dish is the basis for my next webisode of Exotic Table, so stay tuned!

One dish Chef Santiago taught me was a quesadilla with Oaxaca cheese, corn, and huitlacoche, a fungus that actually grows on the corn and is a Mexican delicacy.  Here, I decided to use that as inspiration for a salad, substituting some farm stand shitakes to add the earthy kick from otherwise hard-to-find huitlacoche and threw in some gorgeous grape tomatoes.  Bright and filled with end of summer flavors, this is a super easy dish to make at home, tortilla bowls included.  Enjoy!

Ingredients

Yields 4 servings

4 corn tortillas (the thinnest you can find)

Butter and olive oil

¾ cup shitake mushrooms, thinly sliced

1 shallot, finely chopped

1 jalapeno, seeded and finely chopped

1 ¼ cups fresh corn kernels (about 2 ears)

6 – 8 grape tomatoes, halved

handful of cilantro, chopped

farmer’s cheese or queso fresco

salt and freshly ground black pepper

Procedure

The first step is to make the tortilla “bowls.”  Rather than deep-frying to achieve pliability and moldability, I like to go a bit healthier and just use a skillet with a touch of butter and/or olive oil to get similar results. While doing this, you’re going to use small bowls that fit inside each other to mold the tortillas.  They will not turn out as crisp (and using thinner tortillas will help), but this method makes me feel better about calling this a salad.

Simply heat a medium-sized skillet over medium-high heat.  When hot, add the tortilla and flip at intervals until it puffs and browns a bit.  You’ll feel the edges start to get crispy.  At this point, add a ½ tablespoon of butter or olive oil and let coat the tortilla.   Place a small bowl upside down on a cookie sheet.  Remove tortilla carefully and place on top of the overturned bowl.  Take another bowl, overturned, and put it on top.  It should mold the tortilla to the shape of the bowl and hold it in place as it cools.   Repeat for remaining tortillas, and let cool while preparing the rest of the ingredients.

Heat the same skillet over medium-high heat, and add another tablespoon of butter with 1 to 2 tablespoons of oil.  When the foam subsides, add the mushrooms and let sit undisturbed in a single layer for about 2 minutes.  You want to develop a nice, golden brown on the mushrooms and bring out the flavor.   Stir the mushrooms and sauté for another minute or two to cook through.  Add salt at the end to taste and, using a slotted spoon, transfer to a bowl.

Add another tablespoon or two of butter or olive oil to the pan.  Add shallots and jalapeno and a bit of salt to draw out the moisture.  When shallots are translucent (about 3 to 4 minutes), add corn kernels and tomatoes and toss to mix thoroughly.  I like to crank the heat up a bit here to develop a more roasted flavor to the corn, but be careful because the corn can start to pop a bit.  Cook for 5 to 7 minutes until corn is cooked through and tomatoes have puckered a bit.

Remove from the heat, toss back in the mushrooms, season with salt and freshly ground pepper to taste and add some chopped cilantro, reserving some of the cilantro for garnish.  Spoon mixture into tortilla bowls and dollop farmer’s cheese or queso fresco to your heart’s content.  Garnish with remaining cilantro and serve warm or room temperature.

tags: corn, mushrooms, recipes for summer, Mexican recipes, Tortilleria Nixtamal
categories: recipes, soups & salads, all-2, vegetarian-1, main dishes-1
Monday 09.12.11
Posted by Aliya LeeKong
 

Heirloom Tomato Shakshuka

View fullsize shakshuka-pic1-500x396.jpg
View fullsize shakshuka-pic2-500x333.jpg
View fullsize shakshuka-pic3-500x333.jpg
View fullsize shakshuka-pic4-500x166.jpg

Heirloom Tomato Shakshuka

Summer’s tomatoes have been a constant source of inspiration – from different salads to bruschetta toppings to side dishes and even simply roasted and sprinkled with sea salt.  The late summer varieties and, particularly, the heirlooms were speaking to me last weekend. I wanted to create a dish that, typically calling for canned whole tomatoes, would benefit from the intense flavor and sweetness these tomatoes offer.  I went with a Maghreb dish called shakshuka.

My inspiration started with a local farm stand’s crazy number of heirloom varieties.  I went with the heirloom plum tomatoes, which are excellent for a sauce like this.

The Maghreb region incorporates the northwest portion of Africa – Tunisia, Morocco, Libya, Algeria and Mauritania.  Shakshuka is a mainstay there – baked eggs over an onion and tomato sauce that’s eaten for breakfast or supper – and even made its way to Israel where it’s an extremely popular dish.  The main ingredients for the dish are tomatoes, onions, garlic and eggs, and it differs from country to country, city to city, family to family.  It can be as simple or extravagant as you like – I tailored this version to my tastes, but feel free to make it your own!

First, please excuse the overcooked eggs in these pictures.  My husband likes everything well done and I didn’t take the dish out early enough for the final picture…ha!  It was still delicious and the cheese melted down and got all brown and bubbly.  The sweet onions, the intensity of those tomatoes, a bit of heat from the chilies and the fragrant spices – cumin, saffron, smoked paprika….it was all a bit heady.  I got a fresh-baked, roasted garlic loaf, sliced that baby up and toasted with a bit of butter.  The combination was heavenly!  I could put that sauce on anything (grilled fish, some nicely seared scallops, that bread alone…) and be incredibly happy.  This is my brunch staple…enjoy!

Ingredients

Serves 4 – 5

¾ tsp whole cumin seeds

2-3 tbsps olive oil

2 yellow onions, thinly sliced

3 – 4 red peppers, mix of hot and sweet*

pinch of saffron

1 tsp smoked paprika

3 cloves garlic, thinly sliced

4 sprigs thyme

2 bay leaves

2 lbs heirloom plum tomatoes, roughly chopped

handful of cilantro, chopped

salt and freshly ground black pepper to taste

1/3 cup fresh cheese (cream cheese, farmer’s cheese or queso fresco all work well)

6 whole eggs

Procedure

I like to cook this in a skillet and then transfer to a clay baking dish to finish in the oven.  You can just as easily make this in a cast-iron pan for double-duty or simply cover and finish this dish on the stove.  If you are finishing in the oven, preheat the broiler.

Heat a large skillet over medium heat.  Add cumin seeds and dry toast until fragrant.  Add olive oil, sliced onions, peppers, saffron, and paprika and cook for 6 to 8 minutes until onions are translucent.  Add garlic, thyme and bay leaf and sauté another minute or two until the garlic is fragrant.  I add in the thyme whole, let the leaves fall off, and pull off the stems later.  If you want to remove the leaves from the stems before adding, feel free.

Now, add in the rough-chopped tomatoes (seeds and all!) and cook for another 12 to 15 minutes until tomatoes have softened, much of the liquid has evaporated, and the dish has taken on a thick, sauce-like consistency.

Remove the thyme stems, if left in, and bay leaves.  Add the chopped cilantro, reserving a few tablespoons for garnish, and adjust seasoning.

If you are transferring to a baking dish, do this now.  Divide the cheese into small bite-sized pieces with your hands, and dot the surface of the sauce with it.  Carefully, crack the eggs over the sauce so that the eggs are distributed evenly across the surface.  Sprinkle the tops of the eggs with a bit of salt.  Either cover dish with a lid or foil and cook for another 6 to 8 minutes or place under the broiler for 3 to 4 minutes until the whites of the eggs have set and the cheese is melted.

Garnish with remaining chopped cilantro and serve hot with thick-cut pieces of toast.

* I used (2) hot red chilies and (2) medium-sized sweet peppers, but feel free to adapt to your own tastes.

tags: recipes for summer, eggs, brunch, heirloom tomato, shakshuka
categories: breakfast, recipes, vegetarian, all-2
Monday 08.29.11
Posted by Aliya LeeKong
 
Newer / Older